Welcome back to the Wulverblog! This is part two of my in depth rigging and animating Tips and Tricks series. This will be a quick post covering Meshes and Skinning. Like Inverse Kinematics, this feature was added to Spine some time ago but I hadn’t gotten around to writing about our experience with it.
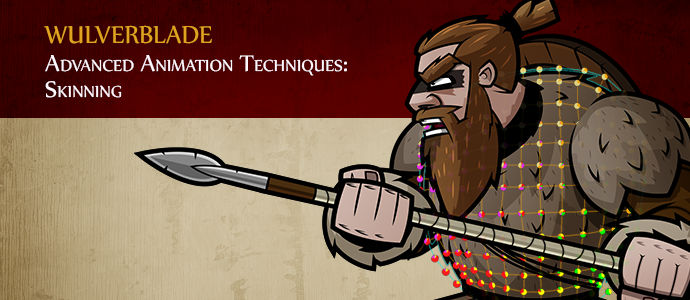
One of my earliest blog posts was about using a Mesh in Spine. At the time, we were able to create fluid animation by moving and keying many individual vertices. This was effective but extremely tedious. Skinning expands upon this feature and works in 2D as it does in 3D. We are able to define how much influence each bone has upon a certain vertex.
The colored handles shown at each vertex is a clean and clear way to visualize the distribution of weights. Adjusting and smoothing these weights is simple with the Spine interface. One of the most important tips to remember: Weights can be adjusted while in “Animate” mode! Since Spine is based on a default pose system, if you adjust the default set-up pose, every animation will be adjusted by the same amount. Depending on how far along your animations are, you’ll want to keep those changes to a minimum. Testing your skin and weight in set-up mode can become potentially problematic.
There is also no “Set Preferred Angle” or “Return to Preferred Angle” feature like those that can be found in some 3D rigging software. When painting weights for 3D rigs, I find it easiest to set the bones “preferred angle” to their t-pose. I am then able to manipulate the skeleton into various poses, make sure all weights are working appropriately, and return the model to the desired t-pose. In Spine, being able to adjust the weights in animation mode works in the same way. I can create test animations, bend and pose the character to all the extremes we might expect to see, then smooth and adjust the skin weights, all without accidentally changing the set-up positions. These test animations can get pretty weird by the end.

Uses
All of our characters use skinned meshes. Any character made before meshes and skinning were available have been upgraded with skinned meshes to make sure the quality of our animations are consistent. Due to the style in which our characters are drawn, we often have to use higher density meshes to better maintain the width and sharpness of a character’s stroke. Even with complex meshes, polycount isn’t too much of a concern because we are working in 2D.
Meshes are most often found in parts of a character that require secondary motion or need to bend: hanging belts, waist cloths, bows, capes, hair, dresses, and torsos. Appendages are drawn as multiple pieces and are typically stiff enough to not require the use of meshes, but it certainly has happened before.
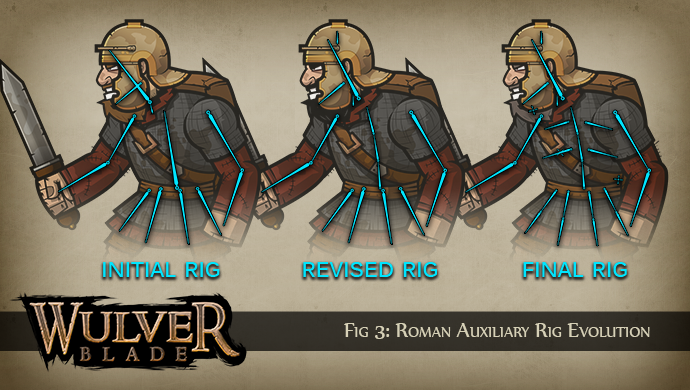
Our skeletal design has also become more advanced since the beginning of the project. Originally, our characters had a single bone in their chest. In earlier versions of Spine, meshes didn’t exist and you couldn’t bend an asset, so only one bone was necessary (Fig 4: Initial Rig). When Meshes and Skinning became available, we started using 3-4 bones for a character’s spine depending on how long their torso was (Fig 4: Revised Rig). This let us bend their torso back and forth as we pleased without ever having to switch images. Our final set-up incorporates four additional bones in the chest that represent the rib cage (Fig 4: Final Rig). It is a common set up in 3D that helps with deformation and allows for far greater control.
As with most of Spines features, meshes and weights are fun to play around with and use in interesting ways. On future projects, I would love to experiment with the idea of more customizable 2D characters. By using additional bones and clever weighting, we could create a skeleton that would let the user define muscle size, height, weight, etc. Just something fun to think about.
Thanks to everyone for reading, I should have another post up in the coming weeks. Feel free to ask questions or share your opinions in the comment section below. Make sure to stay tuned into me (@evandoody) or Mike (@michaelheald) for the latest updates and announcements!