Hey all,
Evan Doody back again, as promised! I would like to start by thanking everyone for all the positive feedback on my last post and for sharing that post as well. It means a lot to us here. For those of you joining us for the first time here on the Wulverblade Blog, welcome! Last time I covered one of our primary animation systems, 2D Skeletal animation. Today we continue down a similar path as I cover frame by frame animation, mesh based animation, and some methods of optimization. This post will be slightly more technical than the last one, so I will try to break things down to the best of my ability for all readers.
Frame-by-Frame
Creating frame by frame animation can be a difficult and time consuming task. However, it adds a level of polish not easily replicated through other means while enhancing Wulverblade’s distinct art style. We use this form of animation for various effects including: blood, explosions, fire, water, smoke, and cloth.
As much as I love the look and feel of traditional animation effects, I have minimal experience in the creation of such work. For this reason we turn to the professionals. Ours goes by Denis. Denis is a traditional animator with a fantastic understanding of fluid motion and timing. Using Flash, Denis continues to brilliantly handle the massively varying tasks we throw at him.
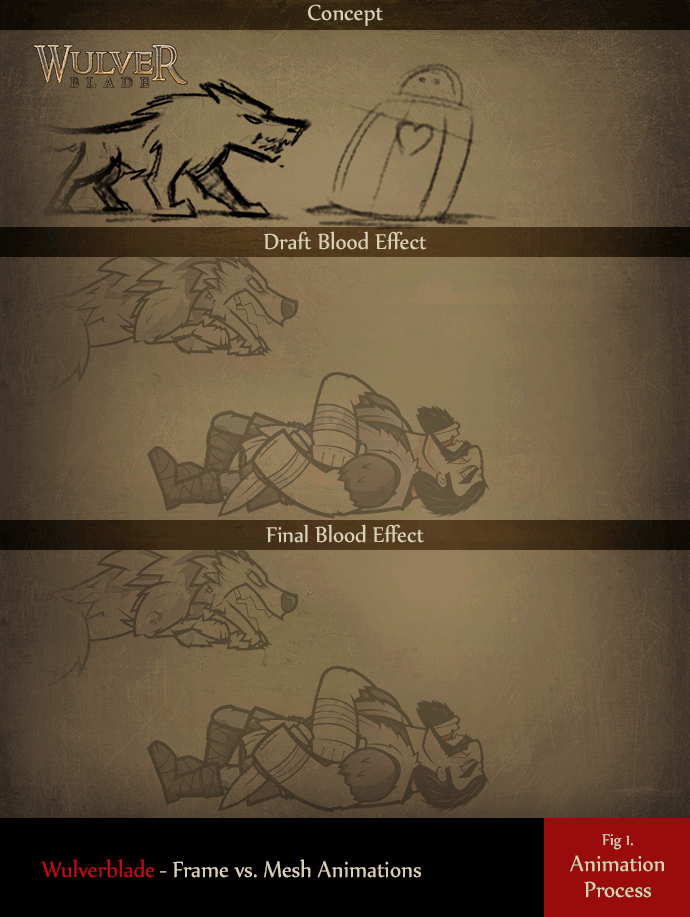
Upon receiving a request, Denis starts with a rough sketch to feel out the fundamentals of the animation at hand. When satisfied, he moves the basic forms through the laid out keyframes. Throughout the process, Denis checks in regularly to confirm the style with us. He adds in layers of detail until both parties are satisfied. When we have something looking and feeling great, Denis bumps the animation up to the appropriate frame rate of 24fps by creating the smooth in-between frames.
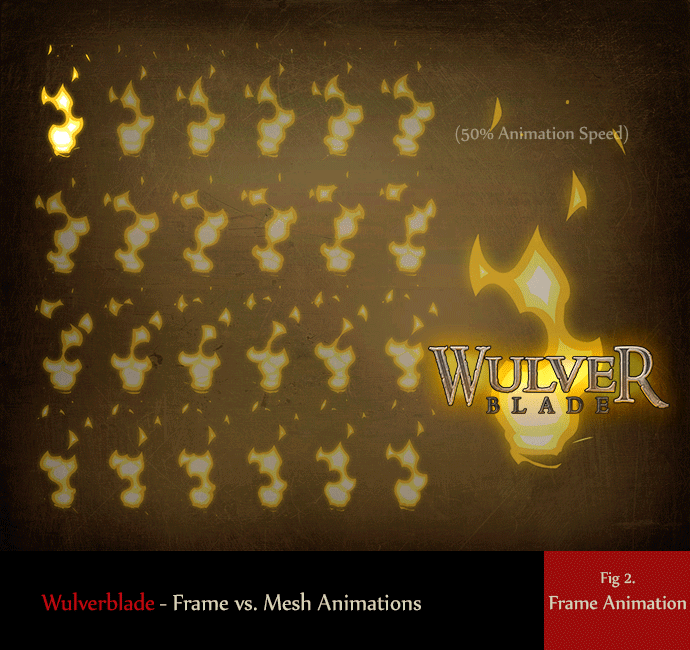
Each frame is exported from Flash at the appropriate resolution and brought into Unity. Here, we use 2D Toolkit to generate an atlas and cycle through each image at a desired frame rate. Traditional frame-by-frame animation is the least efficient in regards to texture size but allows for the greatest control over the final appearance. We use 2D Toolkit’s dicing feature to maximize texture space and remove unnecessary transparency, but that only goes so far. In the classic 2D games we admire, every pose of every character had to fit on an atlas to be cycled through. At modern resolutions, this would not be feasible. The introduction of skeletal animations helps reduce these texture sizes, and now mesh deformations have taken it one step further.
Mesh Deformations
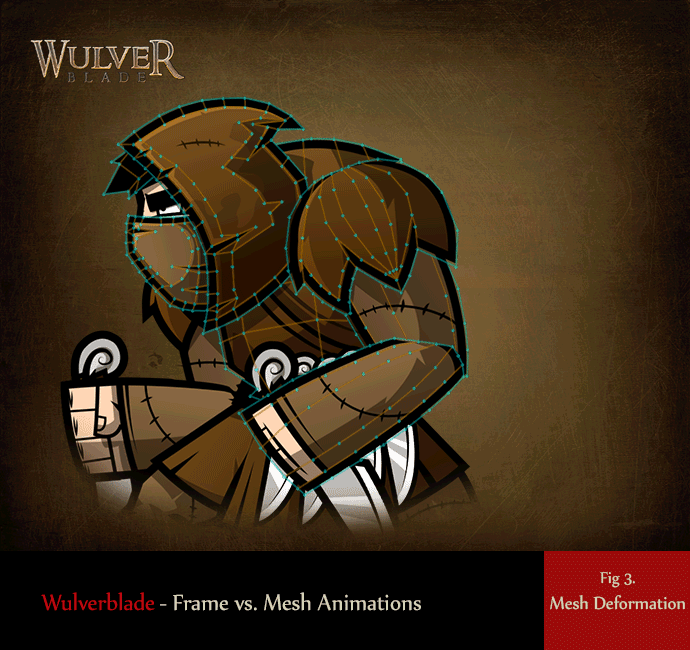
Mesh deformations are made possible by one of Spine’s more recent updates. It allows for a static 2D image to be broken down into customized polygons. These polygons can then be stretched or warped by the manipulation of each individual vertex. The ability to warp an image on a skeleton is immensely useful for creating secondary motion in an animation without requiring any additional textures. The vertices can also be skinned to multiple bones, allowing the mesh to follow and bend with the changing directions of a skeleton . The influence each bone has over a vertex can also be adjusted and smoothed.
A comparison between the warping animation shown above and it’s original counterpart can be seen here. Movements made with mesh deformation are often subtle but can take a 2D animation to the next level. More examples of mesh deformation can be found on the Spine forums. I’ve been excited about Spine’s mesh deformation functionality since I first saw their kickstarter campaign. It’s a tool that can be utilized far beyond the basic secondary motion shown above in the knife thrower and a feature I’m excited to use more often.
Mesh Animations
We want the world of Wulverblade to feel alive. Every scene and every view should draw the player into the beautifully dreary and intense world that was ancient Britannia. To accomplish this vital task, we turn to our traditional animator to create fantastically flowing environmental effects. Here, for example, we have a simple cloth doorway used in our village scene:

These traditional effects turn the world into a living, breathing character of the game. Their sharp but fluid motion adds that “something special” that simply can’t be matched in our style by a particle system or cloth dynamic. We’re always excited when Denis sends us a new animation. However, because we work at a high resolution and a high frame rate, texture space can quickly become a problem.
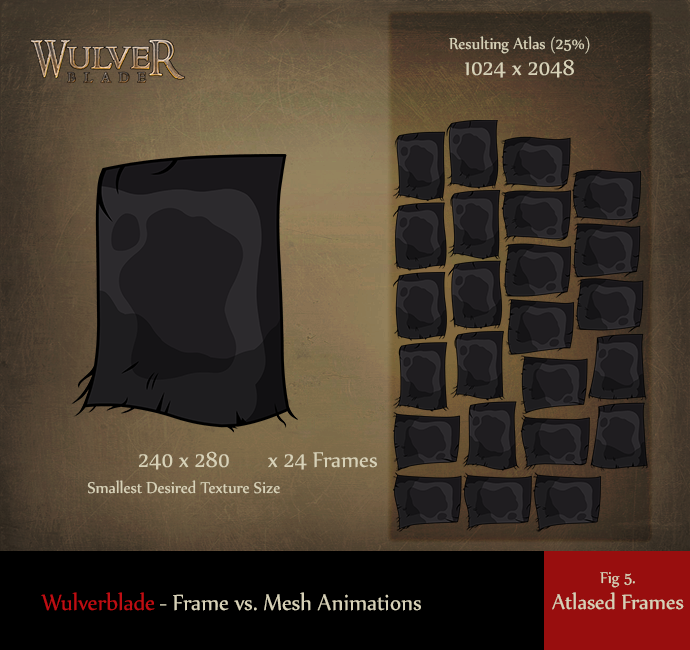
Mike works at an extremely high resolution when creating his environment. His choice to do so pays off in the amount of detail he continually astounds us with. One of the more overwhelming aspects of this project has been maintaining Mike’s level of quality in a real-time interactive environment. Just opening his Photoshop files pushes our hardware to the limits. To maintain that fidelity, each frame of cloth needs to measure roughly 240 by 280 pixels. With 24 frames of animation, that subtle background movement we desire suddenly requires a 1024×2048 texture. This is a lot of texture space for just one of many elements of ambience. With each frame-by-frame environmental effect running similar in size, a single level could require multiple 4096 textures for background animations alone. I turned to Spine and it’s meshes to test a theoretical solution to this problem.
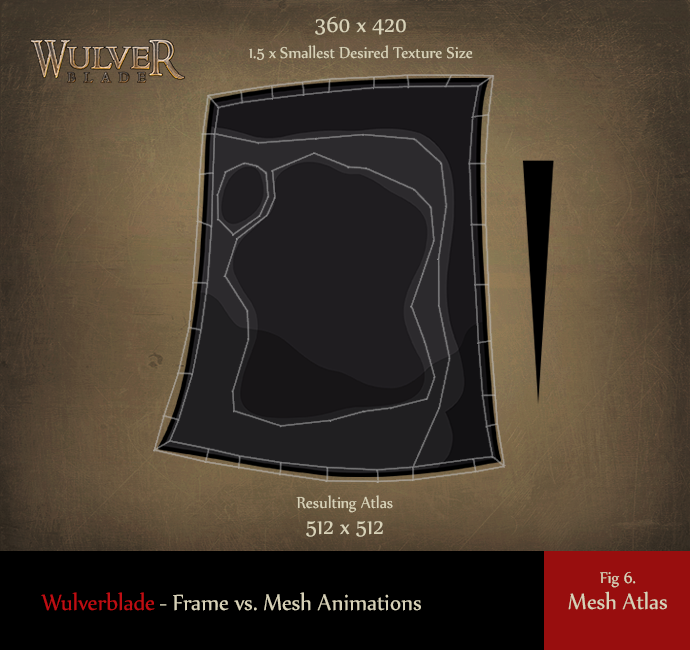
The cloth doorway proved to be the perfect test for reducing a frame based animation into its most basic forms. It could be simplified into two images: the cloth and a black triangle for any strand and tear. If it worked, we’d be able to increase the resolution of cloth and reduce the entire animation down to a single 512×512 atlas with space to spare. Using the exported Flash animation as a template, I created a mesh I hoped would deform well. Maintaining the thick, sharp borders that define the Wulverblade style proved to be the primary challenge. I skinned the black strands to a chain of bones for speedy and smooth articulation. Once I was comfortable with my setup, creating the animation boiled down to tediously following the original to the best of my ability. A side by side comparison of both versions can be seen here.
Successfully recreating the frame by frame animation as a mesh animation was beneficial beyond saving texture space. As a mesh, the cloth image can be substituted and the animation re-used allowing for cheap and efficient visual variety. Additionally, meshes are capable of blending between two different animations. A flag is a good example of where this blending could utilized. By creating a swaying “Idle” animation and a “Wind Blowing” animation, we can match the blending of the animations with the sound of wind at run-time. Each vertex would appropriately translate to the correct position as we switch between animations. In my opinion, one of the best (and coolest) benefit of the mesh based animation is the removal of time restrictions.
Our ability to manipulate the flow of time during gameplay allows us to change how a player perceives the game. We can enhance the combat by slowing down the world to emphasizing a finishing blow. We can use time as a gameplay mechanic, giving the player a short burst of energy that slows down the rest of the world. We can create a feeling of crippling defeat through a “Chun-Li Death,” as it has come to be known around the office.
*Chun-Li Death – n. – A heart sinking feeling that occurs during the slow motion death sequence when Chun-Li is defeated in Street Fighter (specifically Super Street Fighter II Turbo). Often followed by a “You Lose” from the announcer when we play.
Frame based animations are limited to the frame rate they are created at. We create these animations at 24-30 fps to guarantee smooth appearance in real-time. When we utilize slow motion effects these background elements tend to stand out as lower quality. These effects contrast the smoothly interpolating skeletal and mesh components on screen.
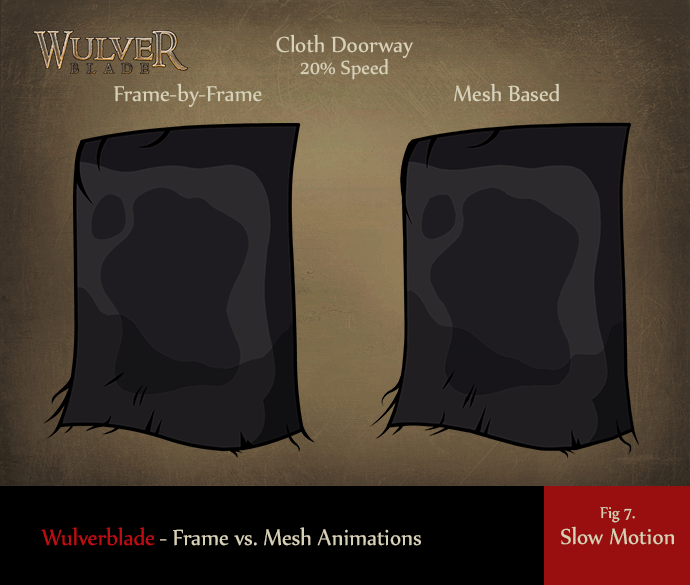
With an animated mesh, each vertex moves smoothly between each of its keyed positions. Due to this fact, the animations can be played at any speed without a stuttering appearance. Denis has to create his animations without the completed game environment available. What looks great as an individual animation can feel too fast or too slow when integrated with additionally animated characters and objects. Mesh based animation allows us to get the timing just right.
Thanks to mesh deformations we’ve been able to make smoother, less restricted, and more efficient animations while maintaining the feeling and quality of a traditional animator’s influence.
This post has become far longer than I anticipated, but only because it’s a topic that interests me. I was going to discuss character attack swipes in this post, but that will be an upcoming mini-post instead. Like always, I encourage any questions or thoughts you have to be shared in the comments! Our goal for the blog is to engage and interact with our current and future fans, in hopes that it will make the game better in the end.
Here is a reminder of the upcoming topics I’ll be writing about soon.
- Swipes – Mini-Expansion on Mesh Deformations
- Shadows – Problems, Solutions, and the next step
- Advanced Skeletal Animation and Rigging – Sort Ordering, Faces, and IK Rigging
- Blocking – Have Shield, Will Block
- Level Building – Building the Beasts
Until next time, thanks for reading!
-Evan