Hey Wulvers …. Wulverites? Wulverines (spelled with a “U” so we can’t be sued)? Whatever. It’s Evan Doody here with another tech-art blog post! This time, I’m going to shed some light on how we add depth to our environments, mainly through the use of parallax. This effect has been used to add depth in games since the beginning…of time. According to Wikipedia, “Parallax is a displacement or difference in the apparent position of an object viewed along two different lines of sight, and is measured by the angle or semi-angle of inclination between those two lines.” Long story short, objects in the background move slower than the camera, and foreground objects move at a rate faster than the camera.
We like to setup our environment scenes with several parallax “layers” to give off the illusion of close, far, really far, and “I think I can see my house from here” far. To do this, we created a simple script which allows us to adjust the position of each layer based on the camera position in the scene. A problem arose, however when Mike presented me with the following object:
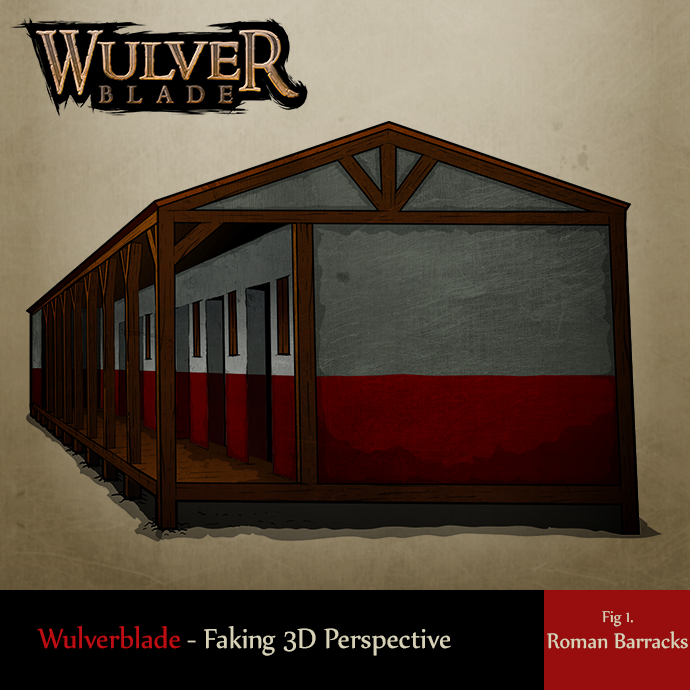
What you’re looking at is a historically accurate Roman Barracks, and a royal pain in my ass. The problem with this building, when drawn at this perspective, is that it spans across more than one parallax depth/layer. It’s so long that, visually, a user would expect the far end of the building to move at a slower rate than the front of the building. This presented a unique challenge, one which we’ve never dealt with before.
There were four options I ultimately had to explore:
- Ignore the problem and try to parallax the level like normal
- Cut the parallax effect from the level all together
- Using a 3D objects
- Fake the perspective of the building
I realize that ignoring the problem doesn’t sound like much of a solution, but if the problem was subtle enough without changing anything it would save me a lot of headache. Sadly, with such a long building, the effect was far from subtle (Fig 2.). There was also the problem that I strongly believe in doing something the right way, even if it’s not always easy. Besides, it would make for a good blog post!
Cutting the parallax from the level is something I really didn’t want to do (Fig 3.). Although this solution worked fairly well, parallax adds so much dimension and visual interest to our 2D scenes. It’s one of the many tools we use to create beautiful levels. The environment would have felt flat in contrast to every other level of the game. Additionally, trying to parallax some elements but not others would make the stationary objects stand out more. So I had to explore more complex solutions.
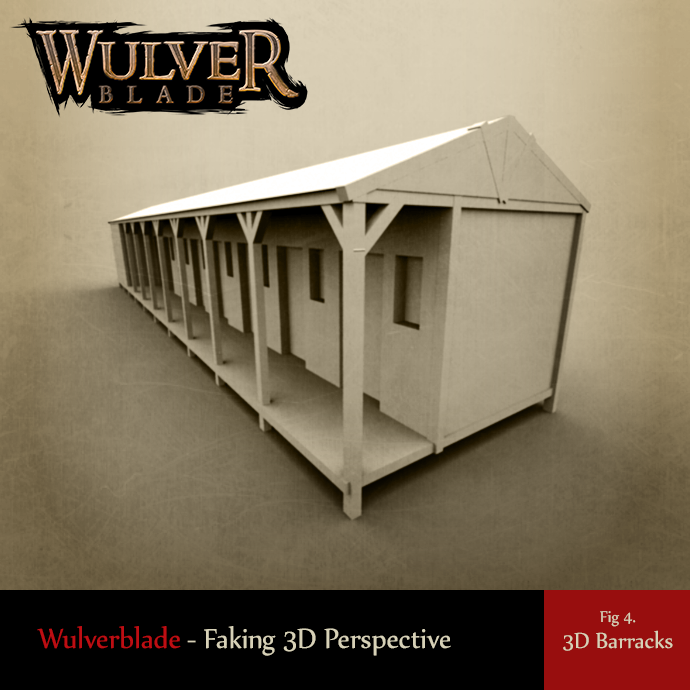
One of these options was using a 3D object in the scene. Mike 3D modeled a simple version of the Barracks before he drew it. This helps him figure out the perspective he wants to utilize and makes it much easier to illustrate. I could project our 2D texture onto this same model and place it in the scene. However, because our game uses 2D orthographic cameras, this wouldn’t completely solve our problem. I would either have to skew the model based on the camera position, or add a perspective based camera to our already complex system. Trying to get a model or camera to play nicely with our otherwise 2D system created a few too many problems, so the idea was scrapped.
My last option was one I had played with in the past, faking 3D perspective in an orthographic camera using 2D sprites. This method uses only flat images and requires a number of things to happen. 1) All faces that point toward the camera translate/parallax based on their perceived depth. 2) All faces perpendicular to the camera in the X direction (side walls) scale. 3) All faces perpendicular to the camera in the Y direction, (floors and ceilings) need to sheer. This is all better explained visually in Fig. 5 using only four flat shapes.
The most complex of these transformations in Unity is sheering a sprite. Thankfully, we’ve tackled this challenge in the past (it was….sheer madness), so it was only a matter of retooling the script. I made three components that could be added to a sprite that would transform the position, sheer, or scale of the sprite based on its position relative to the camera. Each script, naturally, allowed for adjustments of the transformation’s strength.
The Roman Barracks proved particularly complex to break down (Thanks again, Mike). The side of each post that faces the camera was broken out into its own image and given its own parallax value. The two doors closest to the camera were also separated out to improve the effect. Some of the hidden faces had to be recreated because they would not have otherwise been seen. The complexity of the building is what really helps sell the effect in the end.
This effect is heavily used throughout this level. In Fig. 7, you can see that the fort wall and its torches also scale and translate as the camera pans. At the bottom of this post, I’ve include a video that reveals what the barracks actually looks like in the unity scene. That just about wraps up this blog post on perspective! I’d love to hear YOUR perspective on this technique in the comments section. If you have any questions, comments, or requests, feel free to join in the discussion down below or follow me on twitter @evandoody.