Hey everybody! Evan Doody here again. It’s been quite some time since my last technical blog post and I wanted to share some of the things we have been working on.
Today I’m going to briefly talk about our double layered character skeletons. As you probably know from videos, images, or previous blog posts, we’re making a 2 dimensional game that moves in 3 dimensional space. One of the many, MANY, problems this causes will arise when two characters attempt to interact with each other. For a majority of the time, it’s not important for a player to be able to tell exactly which character is standing in front of another. The player and the enemies on screen rarely overlap or interact directly. This was not the case, however, when we introduced grappling.
Grappling is a common move in old school beat ‘em ups. It always felt great, allowed for a variety of play styles, expanded character move sets; naturally we had to have it. It was one of the first moves we implemented when development started, but with it came the problem of interactivity between two characters. An enemy had to be caught between the arms of the hero, but the reality of a 2D character is that there is no space between his arms. The entirety of each character exist on a single plane. For a long time we worked around this problem by hiding the character’s back arm, moving the enemy behind the character in the Z plane, and reducing the space between the player and the enemy held. This is illustrated in Fig 1.
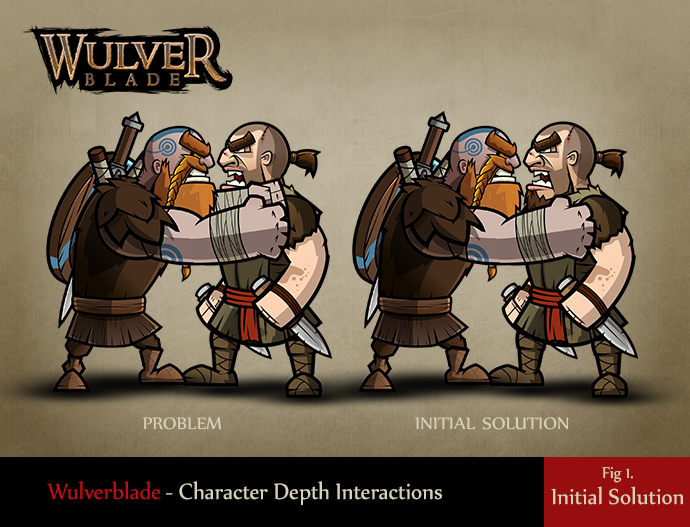
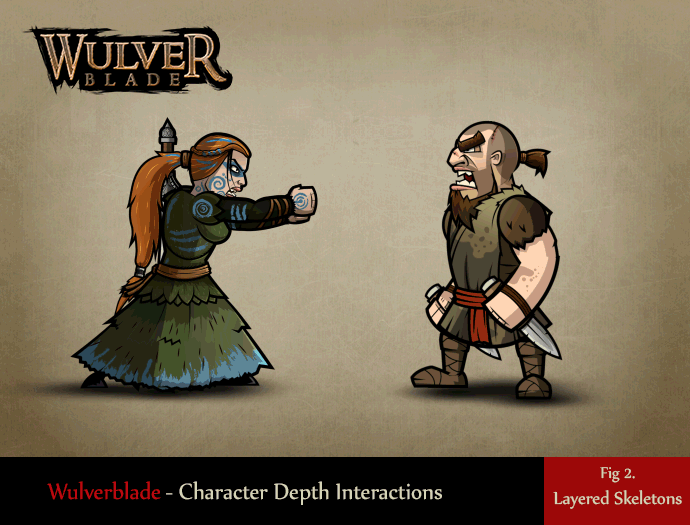
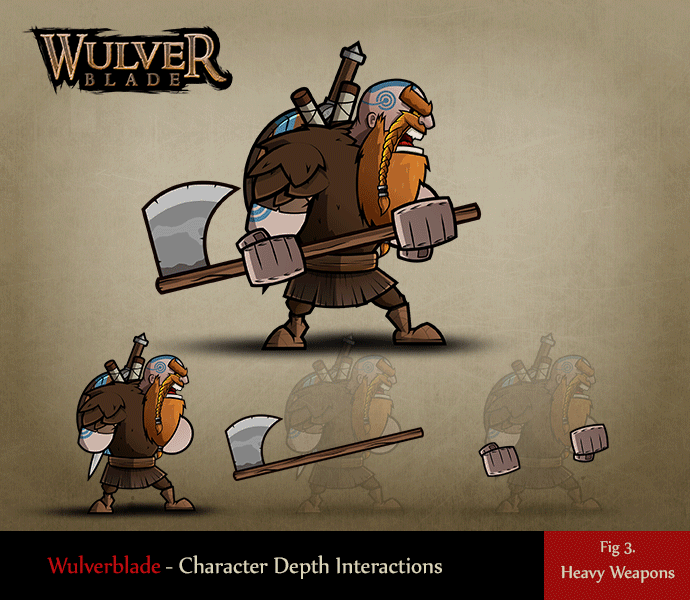
This solution worked well enough for Caradoc, but with the introduction of new characters and new grappling animations, we knew we needed a more elegant solution. Since we already set the Z depth of a grappled enemy in our initial implementation, we knew we could easily place an enemy between two depths. Therefore, a second skeleton for each character was created. This second skeleton only showed the elements of a character that would be in front of a grappled enemy. This skeleton has since become lovingly known as our “Over-Skeleton.” The over-skeleton is setup to perfectly match the movement of the original character. When grappling an enemy, the over-skeleton is enabled and the enemy is placed in a space between these two versions of the character, as shown in Fig 2.
This method proves simple and effective. Once the system was implemented, we were able to explore additional uses. One of the most important improvements it provided was the ability for our characters to hold various objects without adding sprites to the character sprite sheets. Pickups, throwable weapons, and melee weapons were some features we always wanted to implement, and now we could.
Hopefully you enjoyed this slightly shorter post! As always, I hope I can find the time to write more of these. Please bug me on twitter @evandoody so I write more posts…you’re my only hope! Thanks for reading!
EDoody